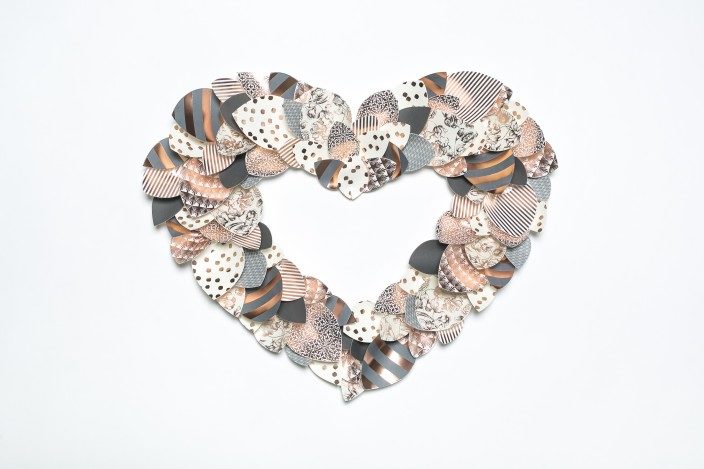
Our team has been getting crafty lately! Jen from our Everyday team (the mastermind behind our decorative National Stationery Show displays every year) put together a few decorative heart-shaped wreaths with Valentine’s Day in mind. She created both wreaths with extra envelope liners that were going to be recycled, but they could easily be made using any of our gift wraps. The first piece is a massive heart made of tiny paper cones. Jen started with a large piece of cardboard for the backing cut into a heart shape (and sized a bit smaller than the final product — you’ll want the cones to hang over a bit so they hide the cardboard edges), then made small paper cones and adhered them to the outside and worked our way in (check out this tutorial for some helpful visuals). We love our ATG guns for craft projects like this one, but you could also use a glue gun for this sort of project.


Jen also created a heart-shaped wreath using a variety of rose gold foil envelope liner scraps, with hints of gray mixed in. For this wreath, she started again with a heart-shaped, cardboard base, but instead of cones, covered the wreath with small leaf shapes adhered with ATG. To give the wreath volume, Jen pinches the adhered end of the leaf just a bit before adhering so that it doesn’t flatten out. The leaves are then layered over the entire base until it’s covered and voilà! A festive (and reusable) Valentine’s Day wreath.

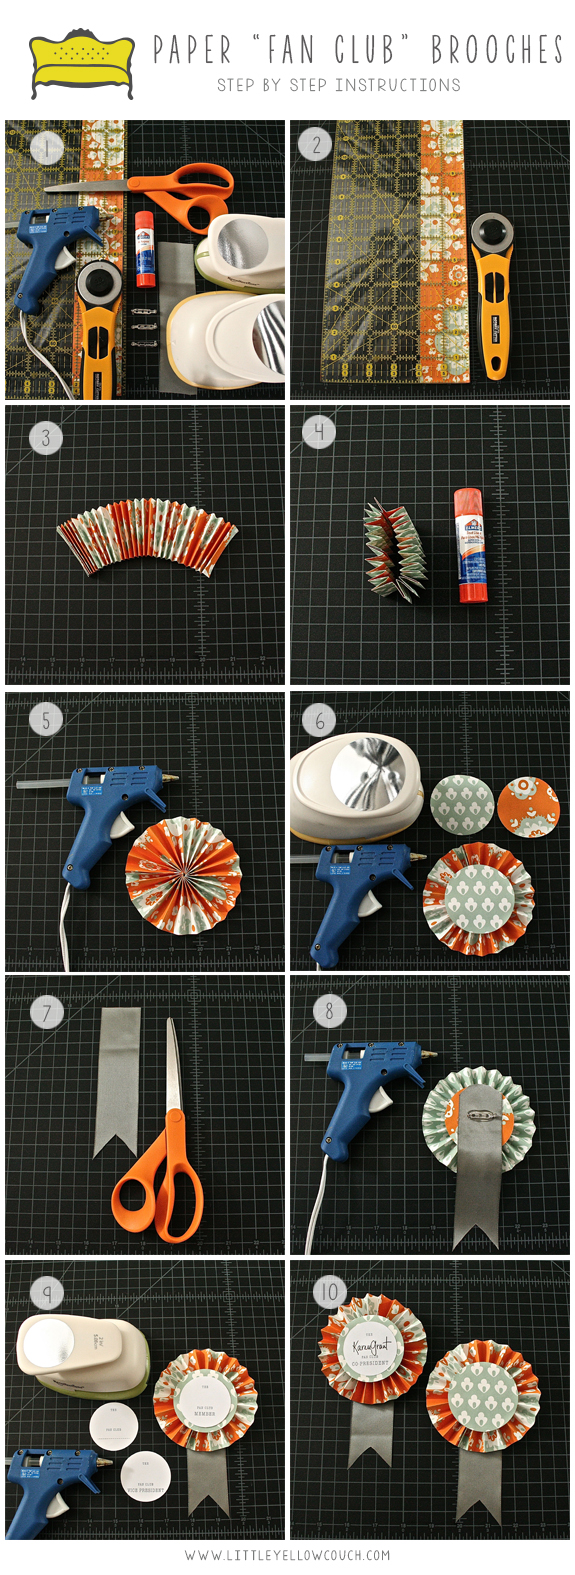
We’ve got a fun DIY featuring our double-sided gift wrap to share today that was recently shown on the Little Yellow Couch! These pins are a cute way to show a little love, or could even be used as prize ribbons. Check out the DIY instructions to make your own!


Supplies:
Directions:
- Gather your supplies.
- Cut a strip of double-sided gift wrap 2″ wide by 24″ long.
- Accordion fold the paper in about 1/2″ wide folds continuing the length of the paper strip.
- Apply the glue stick to both 2″ ends and glue together creating a cylinder. Allow to dry for a few minutes.
- Flatten cylinder to create a circular medallion. Using your glue gun, apply a small dot of hot glue in the center of the medallion and hold circle together for a few seconds to allow glue to harden.
- Using your 2 1/2″ round punch, cut two circles out of the gift wrap. Using your glue gun, adhere one circle to each side of the medallion. We chose to use the opposite design on each side.
- Cut a 6″ piece of ribbon and notch one end.
- Glue ribbon and pin to the back of the medallion.
- If you’d like, print Little Yellow Couch’s Fan Club Titles on card stock. Using your 2″ round punch (or scissors), cut out the circle. Glue to the center of the front of your medallion.
- Go make someone’s day!
Here’s a printable PDF with step by step instructions. Many thanks to the Little Yellow Couch for sharing this cute DIY with us!
We’ve got another special how-to post to share with you today from Carol at Jolie Colis! Last month we shared a beautiful set of gifts featuring our pastel Seersucker gift wrap, and today we’ve got another how-to featuring our Garden Path gift wrap for an extra pretty present! This approach would be perfect for a birthday gift or Mother’s day (which is Sunday, May 12!).
You will need:
- Garden Path gift wrap (or your favorite double-sided gift wrap from our collection!)
- Glue dots or double-sided tape
- Broad satin ribbon
- Narrow satin ribbon
- An ornamental charm*
- Sticky gems and pearls*
*Available in the scrapbooking or jewelry-making section of most craft shops
1. Wrap your box with one side of the gift wrap. Then, cut a strip of paper for a contrasting “belt” to go around the box. The width of the belt is up to you, but we recommend making it a little wider than your broad ribbon.
2. Wrap the contrasting paper belt around the box and secure it on the bottom with a glue dot or double-sided tape.
3. Cut two pieces of the narrow ribbon and wrap them around the box over the belt margin. Secure on the bottom with a glue dot or double-sided tape.
4. Cut a generous piece of the broad ribbon and make a big lush bow, tying on the ornament.
5. Finish with some bling: the little gems and pearls that we used have sticky backs, so they’re easy to add as a finishing touch!
Many thanks to Carol from Jolie Colis for sharing these amazing gift wrapping tips with us today — be sure to stop by
Jolie Colis for even more gift wrapping inspiration!
We’ve got a special treat to share with you today! Carol from Jolie Colis — a talented gift wrapper with an amazing local boutique here in Syracuse that offers custom gift wrapping for special occasions — put together some tips and tricks for how to create a gorgeous gift. We love this stacked set of gifts featuring our pastel Seersucker wrap that Carol put together — it would be perfect for a baby shower, spring holiday gift or even a birthday present!

You will need:
- Seersucker gift wrap (or your favorite double-sided gift wrap from our collection!)
- Glue dots or double sided tape
- Metallic thread*
- Narrow ribbon in a coordinating color
- An ornamental charm*
- Sticky gems and pearls*
*Available in the scrapbooking or jewelry-making section of most craft shops
How to:
1. Wrap the gifts, alternating the paper patterns.
2. Center your gifts in order of size, and secure them together with a glue dot (it’ll be easier to handle this way). Tip: keep the pattern size proportional to the gift size (small gift, small pattern).
3. After you’ve secured the gifts together, wind the thread around the stack several times, criss-crossing to create an interesting pattern. Secure with a knot on the top.
4. Add the narrow ribbon on top in a traditional windowpane pattern. Thread the ornament on as you’re tying the bow (we used a small pearl).
5. Add some bling — the little gems and pearls that we used have sticky backs, so they’re a lot easier to use than they look!
6. For a finishing touch, try our new
foil gift labels — for this gift, we stuck two labels together back-to-back and punched a hole to create a tag effect.
Big thanks to Carol for sharing this fun DIY gift wrap project with us today! Be sure to check out the
Jolie Colis blog for even more gift-wrapping inspiration!
Christmas is right around the corner, and we love having an extra reason to get crafty around here! We made these festive Christmas Trees with our double-sided gift wrap for a little extra holiday cheer — they’re a fun DIY project and pretty enough to give as a gift — just be sure to make a few for yourself!

You will need: a cone/tree form (we preferred the cardboard cones, but styrofoam works, too!), paper, scissors, and a hot glue gun. Start by covering your tree form in the paper color of your choice. We used our Merry wrap for this tree. If you purchase a cardboard tree form, these typically have a point on top, but if you use a styrofoam form (like the one shown above), we recommend making a point with the wrap for a sleek look (see below).
After you’ve covered the tree form, you’ll need curls. LOTS of curls. We used our Merry wrap and our Mistletoe wrap for this part for some variety. To make the curls, cut your paper into thin strips of varying lengths and widths — the variety will help the tree ‘fill in’ nicely. Then, begin curling the strips with scissors the way you would for curling ribbon. When you’ve compiled a decent amount of curls, begin adhering them to your tree with a hot glue gun. 
Fill the entire tree form with the paper curls until you’re happy with the look. If you’d like, make a star to adhere to the top or leave it as is — and tada! A very merry (paper) Christmas tree.

We were inspired by these amazing snowflakes on How About Orange and decided to create our own crafty garland with the pretty paper folds instead of snowflakes! It’s really simple and the end result is stunning, and you’ll only need a few items: paper, scissors, and a glue stick! We used our double-sided, eco-friendly Pageant gift wrap — it’s really cheerful & festive!
Cut 10-15 6 inch squares of your favorite Smock gift wrap. We used Pageant.

Fold each square in half diagonally, then fold it in half diagonally a second time.

Use the scissors to make straight cuts on the triangle, and make sure each cut is evenly spaced apart – we created 5 cuts. Be sure to cut into the folded side of the triangle.

Unfold the paper, then begin assembly by bending the tips of the inner-most sections toward each other. Curl with your fingers to give it shape, then glue the pieces together.

Bend the next set of sections around in the opposite direction until they meet. Overlap the ends and secure with a glue stick. Continue this process until each section is combined.


Begin assembling your garland by gluing the ends of the ornaments to one another. Let dry, hang, and enjoy!


We’re in fall mode around here, and we thought the best way to kick off the weekend would be a little arts & crafts project. These paper pumpkins are super cute & pretty easy to make — and you only need a few supplies! Here’s what you should have on hand:
- A sheet of your favorite Smock gift wrap (I chose our Crochet wrap, but Koi, Jade, or Veranda would work nicely, too!)
- Scissors
- Brads
- A mini hole punch (or a pen/pencil)
- A stapler (optional)
- Tape or glue (optional)

First things first: you’ll need to cut a bunch of thin strips out of the gift wrap (mine were about 8 or 9 inches). Don’t cut the strips much longer than this, or it will get too heavy and your pumpkin won’t sit upright. I cut about 20 strips of paper, but you can cut more or less depending on how “full” you’d like your pumpkin to be (again, keep in mind that you want the pumpkin to stand up, so try not to weigh things down too much). The thickness can vary, but the length should be the same.

Next, arrange your strips in a circle like so:

From here, there are a few ways to do things. I chose to staple the bottom of my pumpkin together, and gathered about a third of the strips at a time and stapled them in the middle. When I had three little groupings, I stapled all three together to keep things secure. You could also use glue for this part, or if you’d rather, you can hole-punch the ends of the strips and use a brad to secure everything at the bottom. Using a brad will make it easier to adjust the “body” of your pumpkin, but I liked having half of the pumpkin secure and then making adjustments up top.
Next, you’ll need to punch a (small) hole near the end of each strip. After you’ve punched the holes, one by one, push the brad through each hole, and then secure the brad.

Next, you’ll want to make the finishing touches. I cut a medium and a thin strip of paper and wound them up tightly to create the stem and a curly little vine.

I adhered the stem by stapling & folding the paper, and then taped down the vine with a thin strip of tape on top.

And voila! A sweet little paper pumpkin — cute decor for fall AND a fun little DIY project for the weekend — what’s not to love!? Are you planning on creating a Smock pumpkin patch?? Send us your photos on Twitter — we’d love to see them!
Got the back to school blues? This DIY is an adorable way to spruce up your school books (or any other books, for that matter) and it’s super easy! You will need:

To start, you’ll need to measure and cut your sheet of gift wrap to fit your book. We recommend giving a 3-4-inch margin on either side of the (open) book, and then a 1-2-inch margin above and below the book.


After you’ve cut your gift wrap, fold up the top and bottom of the sheet. Be sure that the folds are not shorter than the book. Use a few pieces of tape in the middle to keep everything straight.

Next, with the book inside, fold the paper in half, making sure the sides are even. Then, take the top part of the gift wrap and fold it neatly under the book’s cover. Repeat this step on the bottom.

After you’ve made even folds, carefully slip onto the book, securing the book’s cover into the little pockets that the folds create. Secure with tape.

Tada! We are loving the end result. And since our gift wrap is double-sided, you can alternate patterns – perfect for prettying up a set of books to display at home!
Couldn’t make it to the Summer Social at Urbanic? Dying to make your own bundle of fabulous Smock pinwheels? Here’s the how-to!

No great pinwheel is complete without our eco gift wrap – it’s double-sided, so you’ll get bold & beautiful patterns no matter which way you decide to create your masterpiece. Our gift wrap is sustainably printed on 100% post-consumer recycled, FSC-certified paper, so it’s not just pretty, but it’s eco-friendly, too! We’re diggin’ the Sorbet, Pollen and Anchor gift wraps – so perfect for summertime. Pick out your favorite patterns & get crafting today!

Photography – The Why We Love
Our friends at Haute Papier in Leesburg, Virginia recently featured our Smock Everyday Flounce Wrap on their blog- Haute Papier!

We love the Kusudama origami flower they created! For how-to directions please visit: Haute Papier!
(Our double-sided gift wrap, by the way, is made from 100% post-consumer recycled, FSC-certified paper, and is printed via wind power).

")
