Help us welcome summer at the 5th Annual Smock Sidewalk Sale on Wednesday, June 21 from 10am – 7pm. We’ve made some changes to the sale this year (like extending the hours!) to accommodate our loyal shoppers throughout the day. In addition to our deeply discounted cards, gift wraps, and other stationery delights, we’ve brought back some of our favorite local food trucks for the sale this year, too! PB&J’s Lunchbox and Toss & Fire Pizza will be here all day long, so whether you’re stopping by on your lunch hour or after work on your way home, you’ll be able to grab a bite of some delicious local foods. New for this year, we’re excited to welcome our friends at The Sweet Praxis, and to help you keep your cool, Gannon’s Ice Cream and Skippy’s Ice Cream will be joining us throughout the day too!
We’re also pleased to be bringing back a carnival-style fundraiser to benefit our friends at Onondaga Earth Corps — for a $1 donation, you can spin a colorful prize wheel for a chance to win prizes from Smock, as well as some of our participating vendors! Say you’ll be there and stay tuned for event updates on Facebook!

Our friends at The Sweet Praxis are opening a storefront in downtown Syracuse later this summer, and we couldn’t be more excited to support this local business on their new venture! We teamed up with The Sweet Praxis to offer the Smock Gratitude Box, a new pledge option for their current Kickstarter project. Pledge $75 or more, and you’ll receive a Smock box filled with Smock + Sweet Praxis goodies, including a bag of almond toffee, vanilla marshmallows, brownies, a spiral-bound workbook, and assorted cards in one of our medium keepsake boxes. Visit The Sweet Praxis Kickstarter page to make your pledge by July 14th to receive one of these fun boxes. The best part? The box ships for free, so even if you’re not local you can enjoy all the goods! We did a fun photoshoot in honor of the collaboration and paired up some of our new gold foil stamped birthday cards with cupcakes from The Sweet Praxis for some celebratory inspiration – take a look!


We recently added lots of new product to our shop as part of our National Stationery Show release, and we’re getting ready to add more new cards to our lineup next month! To make room for everything new, we’re having a sale — we’re selling mystery packs that contain 10 cards + 10 envelopes for just $10. The packs include a wide range of designs, and are available in 3 styles: occasion, thanks & notes, and holiday, and each pack features a mixture of letterpress and offset printed cards. The photos below show a sampling of some of the cards included in the packs, but each mystery pack will vary. Quantities are limited, and the sale ends on Sunday, so shop now!


We’re excited to announce a new product that we created in collaboration with calligrapher Sarah Hanna: our Love Wins art prints! Sustainably printed in gold matte foil on our white bamboo paper, the prints feature a portion of Justice Anthony Kennedy’s opinion from the historic Supreme Court ruling last Friday. These moving words celebrate the heart and soul of marriage, and we’re thrilled that marriage equality has finally been extended to everyone in our country. #Lovewins


We added over 75 new products to our Everyday line at the 2015 National Stationery Show (if you missed us at the show, check out our NSS booth recap!). Highlights include new cards, keepsake gift boxes, colorful, single-sided gift wrap, foil stamped art prints, and more. Here’s a peek at some of the release, but be sure to check out our new arrivals to see all of our latest offerings!

Yet to Come gold foil stamped art print.

Denim Keepsake Boxes made with 100% post-consumer recycled gift wrap.

Part of Us digitally printed + gold foil stamped sympathy card.

New single sided gift wrap patterns (from bottom): Keiko, Chartreuse, Marav, Spring, Turk.

Miette gold foil stamped birthday card with digital printing.

Gray Marav single-sided gift wrap with a Rose Gold Script foil stamped, die-cut gift tag.
We’re excited to introduce a brand new paper to the Smock line. Our new gray paper is 100% recycled (50% post consumer) and looks beautiful with gold foil stamping. This new paper debuts with our latest release, and is featured on three cards: Happy New Home, Cheers, and Congratulations. Paired with classic white envelopes, these congratulatory cards are festive, fun, and chic.


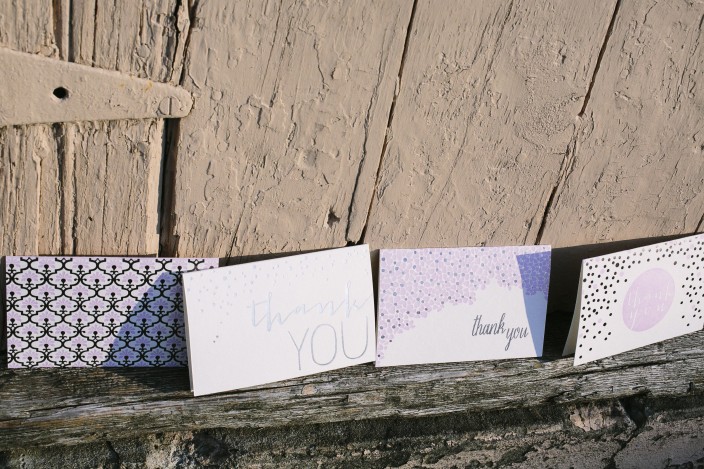
Today we’re sharing a few of our favorite wedding thank you notes – a must-have for anyone tying the knot! Wedding thank you notes can be simple and sweet, or you can choose a style with colors and design elements that reflect your style and personality as a couple. Here are a few styles that we love – but be sure to browse all of our thank you notes to find the one that’s right for you!

Metallics are more popular than ever right now and for good reason: design elements in silver and gold complement just about every color under the sun! Get the metallic look with our Script 2, Thank You Script, Classic Heart and Thank You Shine cards.

Gold foil with black letterpress ink makes for a statement-making card. From the top: Thank You Laurel 2, Brighton 2, Thank You Star, Script 2 and Gold Anchor.

Classic gold or rose gold paired with taupe has a softer, more romantic look – from the left: Chevron Thank You 2, Marav, Tatra 2, Merci, Cameo, Sparkling Thank You.

If you’re infusing blue into your big day, check out our Guild, Chevron, Brighton, Cambridge, Papaya, or Script thank you notes!
You can even work with us to create custom thank you notes to match your wedding invitations and save the dates (find a Smock dealer near you!). Be sure to take a look at some of our favorite bridal shower thank you notes, too!
There are lots of exciting events that go hand-in-hand with weddings: engagement parties, bridal showers, rehearsal dinners, welcome parties, and farewell brunches. While many couples will purchase wedding thank you notes to give thanks for gifts as a couple, we think it’s extra special for a bride to have some of her own stationery when it comes to writing bridal shower thank you notes. We rounded up a few of our favorites below — we love these for bridal shower thank you notes, but many of these cards can pull double-duty and work well as wedding thank you notes, too!

Rose gold is both feminine and romantic – and looks gorgeous next to our taupe letterpress ink. Get the look with our Leaves, Cameo, Classic Heart and Sparkling thank you notes.

Our new Papaya suite features pale blue letterpress ink with a pretty coral colored ink for a fresh, fun look. From the left: Papaya, Terrace 2 and Rainier notes.

Is yellow your color? We love seeing yellow inks paired with gold foil, but you can’t go wrong with gold foil by itself, either. From the left: Yellow Rose, Cambridge 2, Gold, and Thank You Script cards.
If purple and silver are more your style, check out our Grayling, Thank You Shine, Mineral Flowers and Platinum Thank You cards.

Can’t get enough of the color pink? Our Aztec and Kersey Note cards are ideal if you love pastel pink, or check out our Thank You Heart, Thank You Laurel, or Pink Heart cards if hot pink is your color.
Be sure to shop all of our note cards and thank you cards to find the styles that are perfect for you! All of our folded thank you cards and notes are available as singles, six packs, and thirty packs — and our thirty packs come in a small keepsake box! Visit our shop now >>
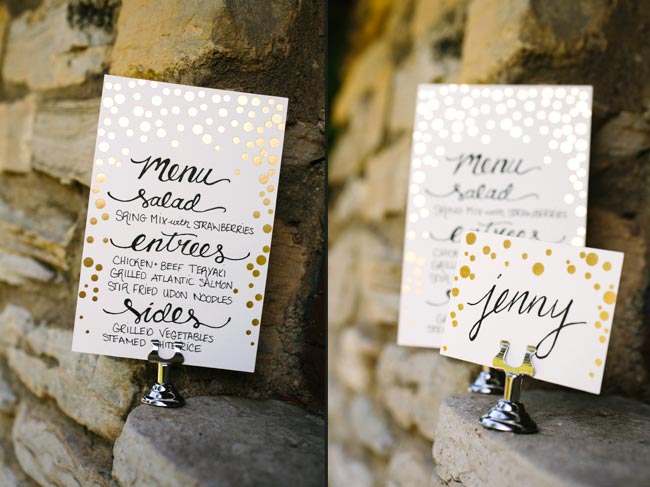
We recently introduced lots of new products at the National Stationery Show, and some of our favorite new items were made with brides (and grooms!) in mind! Our new Everyday Wedding Essentials are a great supplement to our custom wedding invitations – we’re now offering blank and numbered foil stamped table cards in silver and gold foil, as well as escort cards, coasters, congratulatory cards and wedding thank you notes. Our numbered table cards are available in sets of 1-10 and 11-20, and our blank table numbers are ideal if you’re having a very large wedding with lots of tables or if you’d prefer to have your calligrapher hand write each number to match your escort cards and place cards, invitation envelopes, and anything else you might be having calligraphed. Our blank table cards work well for menus and other wedding signage, too!

Rainier blank table cards + Rainier escort cards
Dots blank table cards + Dots escort card

Numbered Dots table cards
Wrap gifts or create festive 4th of July decor with several of our new gift wrap styles! We created a stacked set of red, white & blue gifts using the starry gold & white side of our new Golden Tree wrap, the red striped side of our Berries wrap, and the bright blue patterned side of our Breakers wrap. To finish it off we fashioned a festive firework-inspired gift topper by curling strips of our Chatham and Breakers wraps (just cut strips and use scissors to curl like curling ribbon!).


